I got this idea one day while I was searching for ideas for homemade toys. My daughter loves everything Tinkerbell, so when I saw these, I got really excited and wanted to start on them right away. Too bad I finished them 3 months before her birthday (the wait has been killing me!). :)
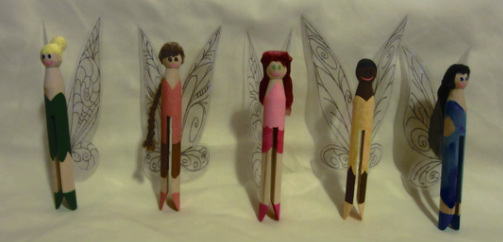
The original idea came from Red Ted Art, but I took the basic form and added my own variations. For one thing, my fairies do not use fabric embellishments for the clothing, though I think it's an adorable idea if you're up for it. My only concern was that for toys that would be loved like I know my young daughter would love these, the fewer pieces that could detach and fall apart, the better. You'll also notice I nixed the glitter on the wings--another wise move when dealing with 3 year-olds. Also, instead of puff balls for the hair, I decided on a variety of materials, depending on the fairy (i.e.: painted wooden beads for the girls with buns, colored felt for those with long, flowing hair, and wired ribbon for hair that needed "styling"). I have included the needs for the whole set of 7 fairy girls I made for my daughter.
One last thing. As with the characters on the Tinkerbell movies, each fairy actually has her own unique wing design. After studying several pictures online and watching the movies (literally) over and over again, I came up with a full set of hand-drawn wing designs that are true to the films. I totally get it if this part is too intricate or time consuming for you, but if you're into detail like I am, it's kinda fun to have them all be different.
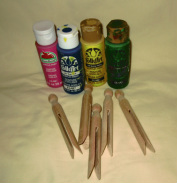
What You'll Need:
- several old-fashioned wooden peg clothespins (I got mine on Amazon--pack of 100 was a little over $11, but they come in smaller packs too. You can also find them at Walmart or craft stores)
- acrylic paint in several colors (and variety of paint brushes for detail painting)
- small wooden (or plastic) beads for buns on Tinkerbell and Iridessa--about 1/4" diameter
- dark red, wired ribbon--1" wide--for Rosetta's hair
- brown yarn for Fawn's hair
- black felt for Vidia and Silvermist's hair
- Cotton ball or white felt for Periwinkle's hair
- acetate sheets (thick, clear plastic like you'd use with page protectors or notebook dividers) -- I used a thick laminating sleeve, which I sent through the laminator empty to seal it and make it sturdy)
- wing template (printable version for tracing here)
- fine-tipped black or other color permanent marker
- hot glue
To start painting, you'll first need colors that correspond with each fairy. You can either buy the colors individually or have fun mixing your own. If you don't know, here is a list of what color goes with each fairy:
Tinkerbell (tinker fairy)-- true green
Fawn (animal fairy) -- orange and brown
Rosetta (garden fairy) -- pink and red
Silvermist (water fairy) -- dark blue and light blue
Iridessa (light fairy) -- sunflower yellow
Vidia (fast-flying fairy) -- dark purple and lavender
Periwinkle (frost fairy) -- turquoise and ice blue
I started by painting a basic dress design on each character. You can find pictures of their various outfits online, and choose the one you like best. Note that for fairies with two colors, you'll want to do the color of the pants/leggings first so it can dry before you paint the shirt overlapping.
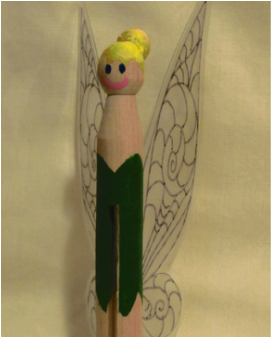
For Tinkerbell, I just did a simple green V-neck on top, with the bottom zig-zagged like a leafy pattern. Paint all the way around the clothespin, and be sure to paint in between the "legs" for a nice, uniform look. This may be where you want to add your own embellishments, such as green fabric or leaf-shaped felt pieces for the skirt (both could be easily attached with hot glue). Also, don't forget about the shoes!
I also used a bright yellow to paint the top and back of her head, as well as the wooden bead I would use for her bun. When everything dried, I painted on a simple smile and blue eyes, but you can use more detail if you want.
When the little hair bead dries, attach it to the back of the head with a small bead of hot glue.
Wait for all the paint and glue to dry fully, then you're ready to begin the wings!
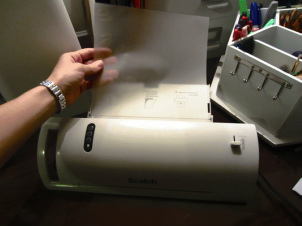
If you have access to a thermal laminator, my method is pretty simple, though a bit tedious with the tracing. Note that this works best with a heavy-duty sleeve because it makes the wings more sturdy when you're done.
First, send the empty sleeve through the laminator to seal it all the way up. You should now have a relatively stiff piece of clear plastic to work with.
First, send the empty sleeve through the laminator to seal it all the way up. You should now have a relatively stiff piece of clear plastic to work with.
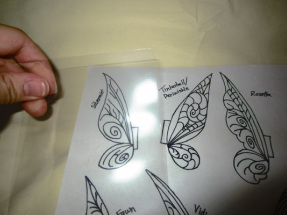
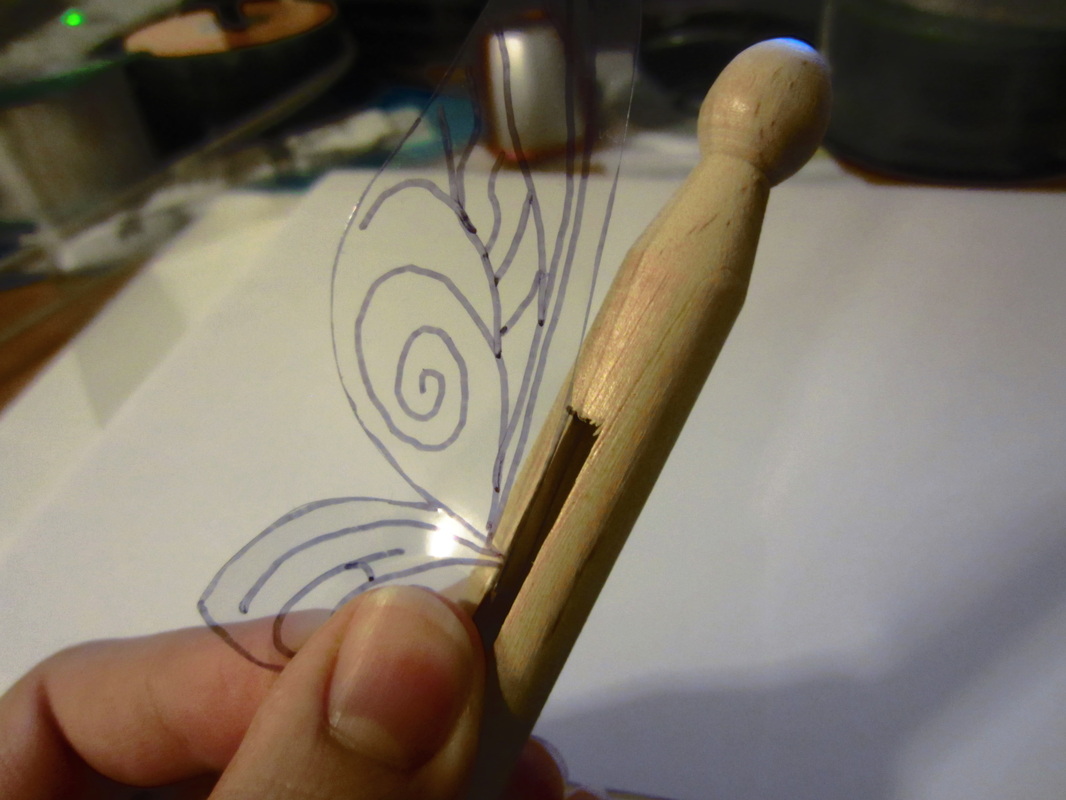
Lay the plastic over the wing template and trace *TWO* of each type. You may want to separate them into piles or do each fairy individually so you don't forget which wings go with which fairy.
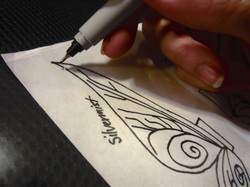
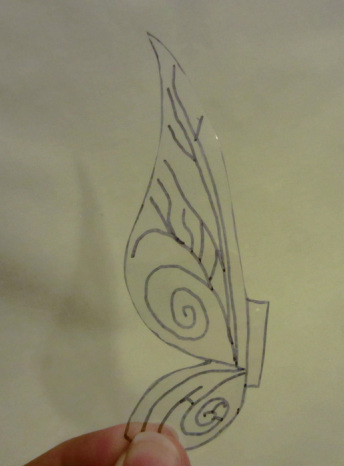
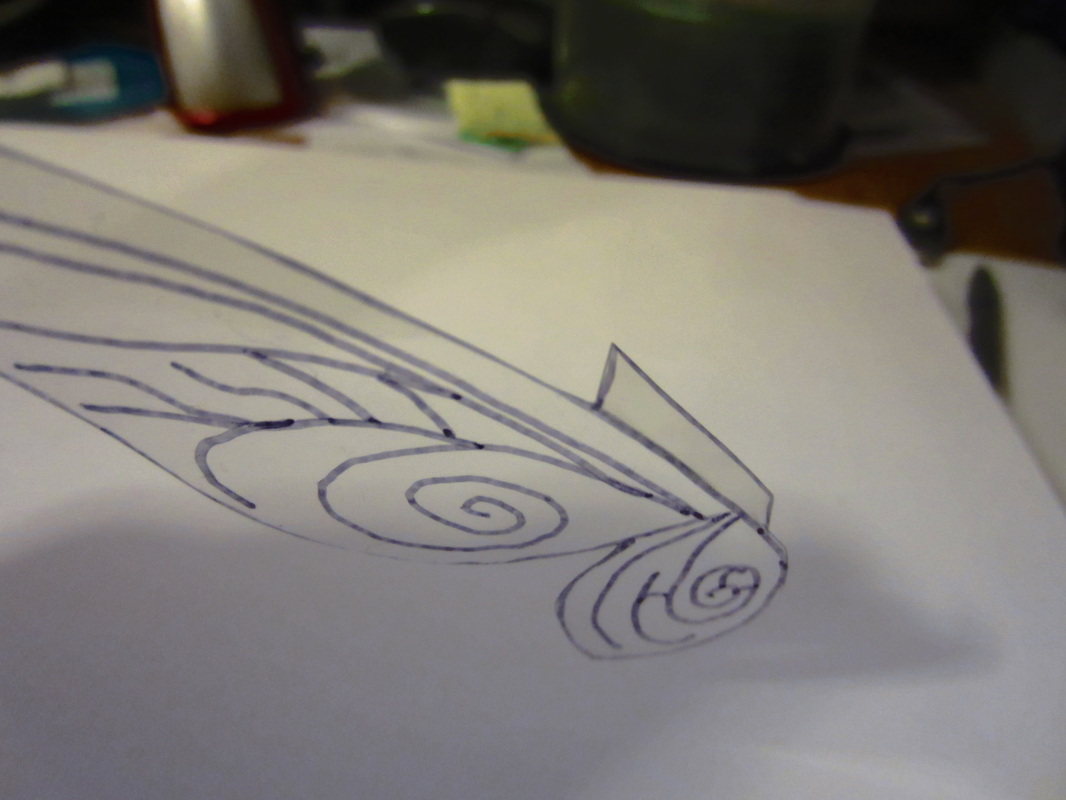
When done tracing, cut out each wing, including the small tab sticking out of the front. This is for attaching the wings to the fairy bodies.
Now, for this next part, I actually sent my wings through another laminator pouch once I cut hem out, then cut them out again. This was for two reasons: I wanted mine extra stiff, so as to withstand the abuse of a three year-old, and I didn't want to take the chance of the marker pattern scraping off. Feel free to do this or skip this step if you wish.
Now, for this next part, I actually sent my wings through another laminator pouch once I cut hem out, then cut them out again. This was for two reasons: I wanted mine extra stiff, so as to withstand the abuse of a three year-old, and I didn't want to take the chance of the marker pattern scraping off. Feel free to do this or skip this step if you wish.
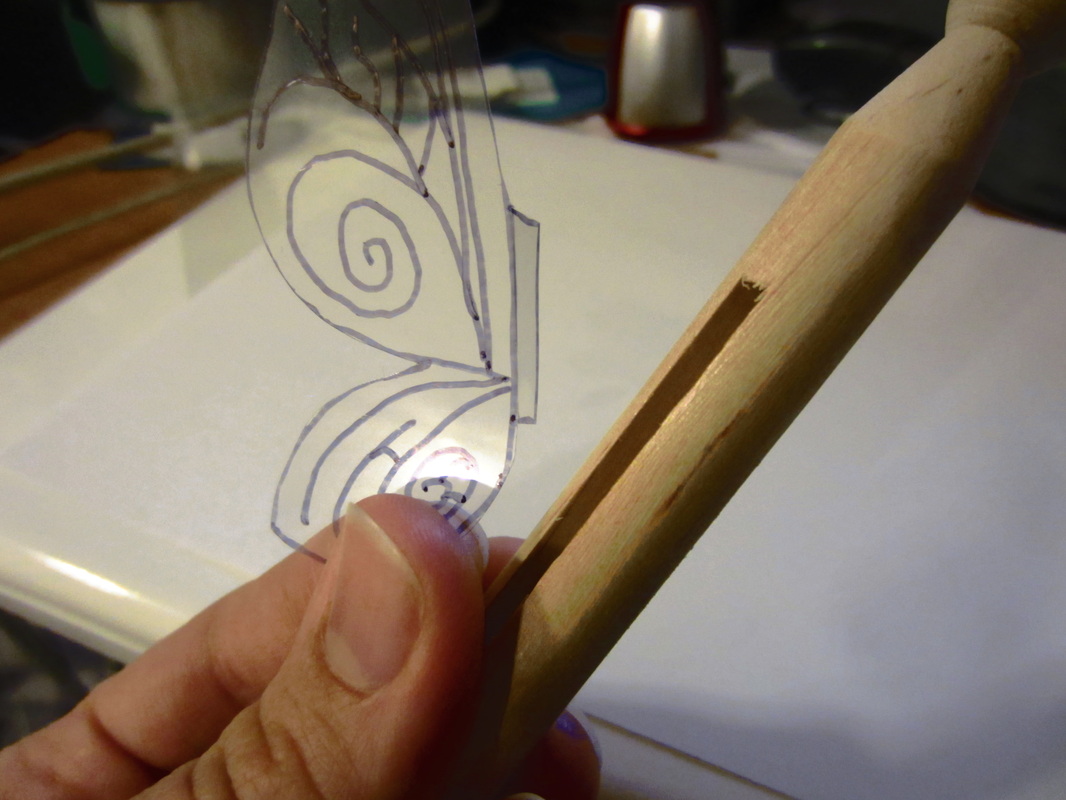
When you have your wings the way you want them, the last step is to attach them to the fairy bodies. If you want the wings to stick straight out the back, leave them as they are. But if you would rather them flare to the sides a bit, like they're flapping, you'll need to firmly fold over the tab on each wing so it meets the rest of the wing. NOTE: Since each fairy has 2 wings, they will need to be folded opposite directions so they stick out on different sides (i.e.: fold one tab over to the right and crease it, and fold the tab on the other wing to the left and crease it).
When the wings are bent, apply a small line of hot glue to the top edge and the INSIDE face of the tab. Insert the tab in the notch of the clothespin so the gluey side sticks to the "inner thigh" of the fairy. Press firmly to the top and inside to seal. I used a popsicle stick to press the tab down on the inside of the notch. Repeat with the other wing and allow them to dry fully.
When the wings are bent, apply a small line of hot glue to the top edge and the INSIDE face of the tab. Insert the tab in the notch of the clothespin so the gluey side sticks to the "inner thigh" of the fairy. Press firmly to the top and inside to seal. I used a popsicle stick to press the tab down on the inside of the notch. Repeat with the other wing and allow them to dry fully.
The final step is applying a thin coat of polyurethane sealant to the fairy bodies and anywhere else paint or wood is exposed. This not only helps protect your newly created toy, but it also allows a smoother finish for handling.
Hair Designs
I realize that each fairy is different, but the instructions for each are mostly the same. The hair is the only part (besides the painting design) that you really have to do much different. Here are individual photos of the fairies' hair with a few notes on how to do each one.
FAWN
Fawn is the animal fairy, and a bit of a tough girl. She wears brown calf-length trousers with an orange sleeveless tunic over the top. Her hair is a very simple braid made of light brown yarn. I tied off each end, leaving the top with some longer fringe pieces to glue down on her forehead as bangs. After the fact, I noticed that she still looked a bit bald, but it was really easy to hot glue some extra pieces of brown yarn around the rest of her head to cover it nicely.
Fawn is the animal fairy, and a bit of a tough girl. She wears brown calf-length trousers with an orange sleeveless tunic over the top. Her hair is a very simple braid made of light brown yarn. I tied off each end, leaving the top with some longer fringe pieces to glue down on her forehead as bangs. After the fact, I noticed that she still looked a bit bald, but it was really easy to hot glue some extra pieces of brown yarn around the rest of her head to cover it nicely.

SILVERMIST
Silvermist is the slightly air-headed water fairy. She wears a long, fitted blue dress that has a strap over one shoulder and flares at the bottom. Her hair is just a cut out piece of black felt. The shape of her hair was tricky because in the movies, it's long and flowing down her back. I managed this by cutting a tapered piece that I could glue to her forehead, neck, and upper back.
Silvermist is the slightly air-headed water fairy. She wears a long, fitted blue dress that has a strap over one shoulder and flares at the bottom. Her hair is just a cut out piece of black felt. The shape of her hair was tricky because in the movies, it's long and flowing down her back. I managed this by cutting a tapered piece that I could glue to her forehead, neck, and upper back.
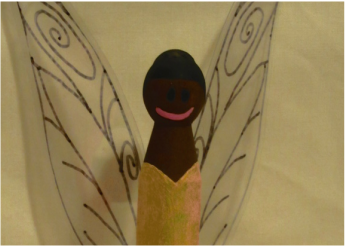
IRIDESSA
The skeptical light fairy. She wears a strapless yellow sun dress that goes to mid-thigh-to-knee. She is the only dark-skinned fairy, which makes the yellow all the more striking. Her hair, like Tinkerbell's, is a painted bead (black) attached at the back of her head by hot glue.
The skeptical light fairy. She wears a strapless yellow sun dress that goes to mid-thigh-to-knee. She is the only dark-skinned fairy, which makes the yellow all the more striking. Her hair, like Tinkerbell's, is a painted bead (black) attached at the back of her head by hot glue.
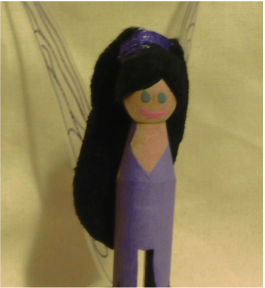
VIDIA
Vidia is the feisty fast-flying fairy. She controls the wind, and although she spends the first movie being Tink's antagonist, she proves to be a great friend later. She wears dark purple leggings that flare at the ankles, with a sleeveless lavender tunic that goes about to her hips. Her hair took a bit more work than Silvermist's but it is also a single piece of cut black felt. After gluing the forehead piece down, I tied a small piece of purple fabric (you could use felt, yarn, thread, etc.) around the felt to make the "ponytail" and glued it down. Then I put one more dab of hot glue on the back of her head so the long ponytail wasn't sticking straight out, but rather, falling down her back.
Vidia is the feisty fast-flying fairy. She controls the wind, and although she spends the first movie being Tink's antagonist, she proves to be a great friend later. She wears dark purple leggings that flare at the ankles, with a sleeveless lavender tunic that goes about to her hips. Her hair took a bit more work than Silvermist's but it is also a single piece of cut black felt. After gluing the forehead piece down, I tied a small piece of purple fabric (you could use felt, yarn, thread, etc.) around the felt to make the "ponytail" and glued it down. Then I put one more dab of hot glue on the back of her head so the long ponytail wasn't sticking straight out, but rather, falling down her back.
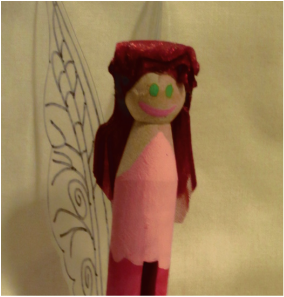
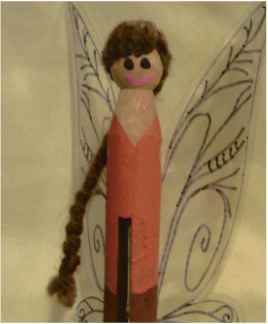
ROSETTA
Rosetta is the prissy Southern garden fairy. She wears a halter top light pink shirt with a dark pink or red mini-skirt made of rose petals. Her hair was the most tricky, though I think turned out the coolest. I used some semi-transparent dark red wired ribbon. First, I folded the ribbon into several short layers so I could have some extra to twist and bend for Rosetta's wavy, flowing locks. I lumped together some pieces for the front, giving her the Southern belle look, then glued the forehead pieces down. For the rest, I bunched a piece in the back into a half-ponytail, pulling it off her face, and let the rest hang down. Note: Glue often with this one--it's temperamental! After I finished the head and neck part, I snipped a few stylish pieces out of the bottom so it would lay right, and I bent the wires so it would look curly. Sorry there isn't more instruction on this one...it was a bit of a learning experience. It just takes some patience and manipulating to get it to look right.
Rosetta is the prissy Southern garden fairy. She wears a halter top light pink shirt with a dark pink or red mini-skirt made of rose petals. Her hair was the most tricky, though I think turned out the coolest. I used some semi-transparent dark red wired ribbon. First, I folded the ribbon into several short layers so I could have some extra to twist and bend for Rosetta's wavy, flowing locks. I lumped together some pieces for the front, giving her the Southern belle look, then glued the forehead pieces down. For the rest, I bunched a piece in the back into a half-ponytail, pulling it off her face, and let the rest hang down. Note: Glue often with this one--it's temperamental! After I finished the head and neck part, I snipped a few stylish pieces out of the bottom so it would lay right, and I bent the wires so it would look curly. Sorry there isn't more instruction on this one...it was a bit of a learning experience. It just takes some patience and manipulating to get it to look right.
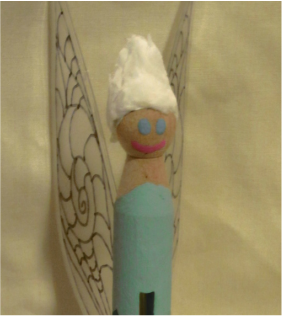
PERIWINKLE
Finally, we have my personal favorite: Periwinkle, the frost fairy who lives in the Winter Woods. Hers and Tink's wings are identical because --SPOILER ALERT-- they are actually long lost sisters born of the same baby's laugh. Periwinkle wears a strapless ice blue shirt with an A-line split on one side. Beneath are calf-length turquoise trousers. Her hair was fun, but can also be tricky. I used a small piece of a cotton ball, clued it to her head (hot glue or Elmer's glue will work fine). Then, I used huge gobs of Elmer's glue like hair gel to shape her hair into the spike look she sports in the movies. It's short, and sticks up in the middle and usually has long strands hanging by her face.
Alternately, you could cut a pointed piece of white felt and glue that to her head if you want something more simple.
That's it! I hope you find ways to make the designs work best for you, and hope you enjoy making these magical little friends! :)
 RSS Feed